Overview
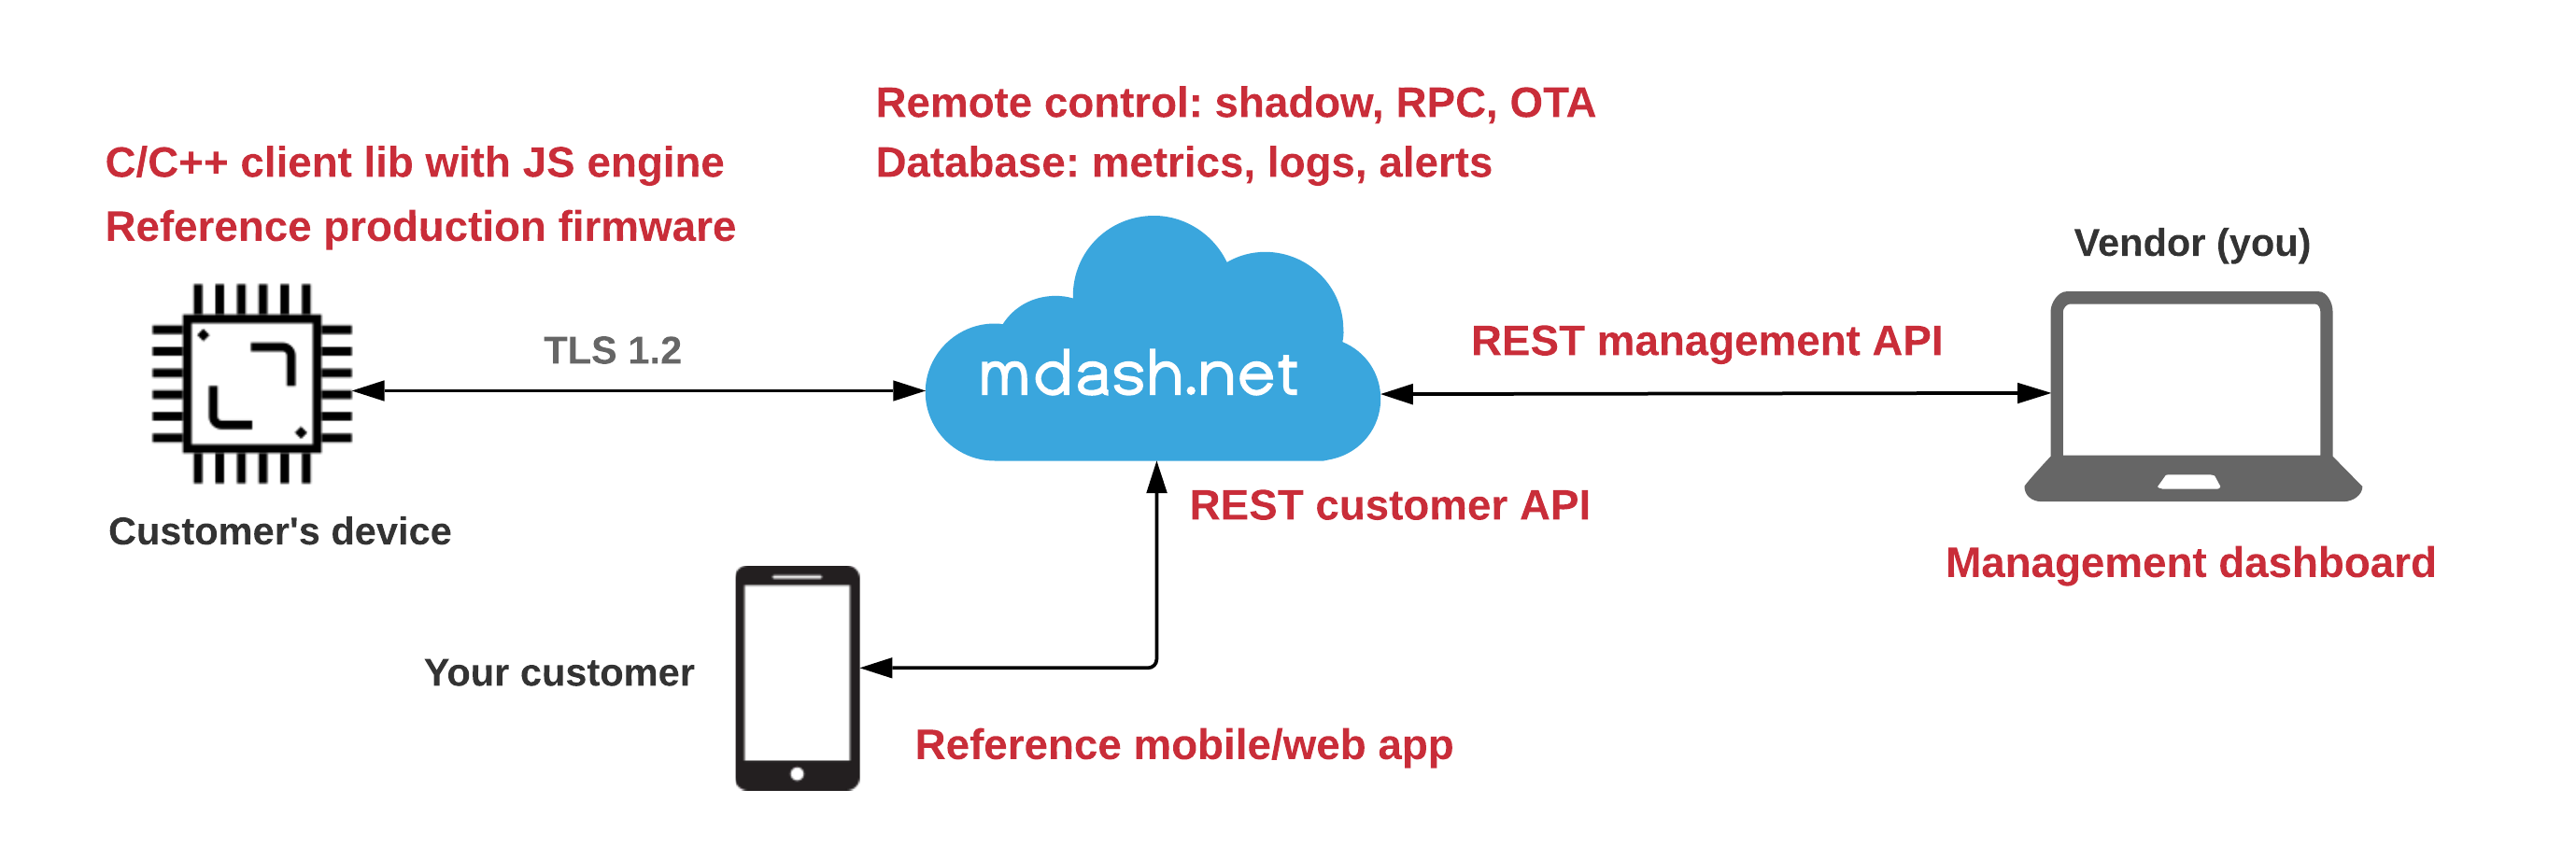
mDash is a framework for developing and maintaining connected products. The main design goal was to provide a robust and easy to use device management capabilities. mDash's remote control is unprecedented: one-click firmware updates (OTA), file management, device shadow/twin, remote function calls, access level control, notifications, database, and more.
mDash could be used either stand-alone, or together with other cloud solutions - like AWS IoT, Azure, Google Cloud, et cetera.
In order to launch a product on mDash, a business needs to implement the hardware part - a physical device itself. mDash's reference firmware and mobile app are simple to modify, thus usually there is no need to outsource the development. If, however, you need help - do not hesitate to contacts us.
Connecting to mDash
Mongoose OS
Step 1. Download and install mos tool in order to flash and configure your board:
| OS | Instructions |
|---|---|
| Windows | Create C:\mos folder. Right-click on this mos.exe link, choose "Save link as", save mos.exe to the C:\mos folder. Start command prompt, enter cd c:\mos and then mos --help |
| MacOS,Linux | Start terminal and enter the following commands:curl -fsSL https://mdash.net/downloads/mos/install.sh | /bin/bashmos --help |
Step 2. Flash your board (change SERIAL_PORT to a ESP32 board's serial port):
mos flash esp32 --port SERIAL_PORT
Step 3. Configure WiFi:
mos wifi WIFI_NETWORK WIFI_PASSWORD --port SERIAL_PORT
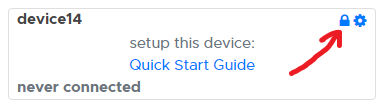
Step 4. Login to https://mdash.net, click on "add device" to register new device, and click on the "lock" icon to copy device password to the clipboard:
Step 5. Provision device to mdash.net:
mos config-set dash.enable=true dash.token=COPIED_DEVICE_PASSWORD --port SERIAL_PORT
Done! After this point, a device must appear "green" on mDash.
Arduino IDE
Use https://github.com/cesanta/mDash client library to connect to mDash. It supports ESP32 architecture.
Connecting ESP32 using Arduino IDE:
Download and install Arduino IDE
Install mDash library:
- Select "Sketch" → "Include Library" → "Manage Libraries"
- In the search field, type "mDash" and press Enter
- Click on "Install" to install the library
Select "Tools" → "Board" → "ESP32 Dev Module"
Select "Tools" → "Partitioning Scheme" → "Minimal SPIFFS"
Select "Tools" → "Port" → your serial port
Select "Examples" → "mDash" → "Minimal"
Edit Minimal.ino sketch - enter WiFi name/password and mDash device password. In order to get mDash device password,
- login to mdash.net
- click on "add device" button to register a new device
- click on a device's lock icon copy it to the clipboard:
- login to mdash.net
In Arduino IDE, click on "Upload" icon to compile and flash the firmware
In mDash, your device should turn green. From this point on, you can manage it remotely - call commands, edit files, update firmware, etc.
See mDash client library API for more details.
ESP-IDF
Use https://github.com/cesanta/mDash client library to connect to mDash. See example firmware code at https://github.com/cesanta/mdash-smart-light/tree/master/firmware/esp-idf
Authentication
mDash uses industry-standard TLS1.2 transport protocol for protecting network traffic. mDash clients use key-based authentication:
- Connected devices. Protocol: Websocket over TLS1.2. Authentication key: a "device password", generated for eash registered device. A device connects to the mDash using that key, can receive management commands, and send notification (e.g. reporting data).
- Management API. Protocol: HTTPS/REST. Authentication key: a "master" API key. Gives root access to everything. You, as a vendor, can create/delete multiple keys. Keep them safe.
- Customer API. Protocol: HTTPS/REST. Authentication key: a "public" API key, generated by a device. Gives a restricted access to that device. The level of access is controlled by per-device ACL settings.
NOTE: mDash also supports MQTT as a transport protocol for devices. However, we would discourage from using it because of a security reasons. A single leaked device password can give an access to the entire fleet. A malicious client can suscribe to the
#wildcard topic to sniff all traffic, and also can send commands to any device connected over MQTT.
Access Control (ACL)
mDash provides an ability to access any device by external users, your customers. In order to accomplish that, mDash has an access control list (ACL) associated with every device. ACL defines a access key for the external customers, which values in the devices shadow they can see and modify, which RPC functions they can call, and whether they can access device data.
The ACL of any device could be modified via the REST API, by sending
a POST request with the acl set. Alternatively, that can be done via the
mDash GUI - click on a device management link and choose "ACL" tab.
Keys reference
{
  "shadow_read": "...",   // Regexp for a publicly visible shadow keys
  "shadow_write": "...",  // Regexp for a publicly writable shadow keys
  "rpc": "Func1,Func2",   // Comma-separated list of accessible RPC methods
  "public_key": "...",    // Public access key
  "data_read": {          // Endpoints in /api/v2/devices/:id/data/QUERY
    "query1": "...",      // In every query, DEVICE_ID is substituted with
    "query2": "..."       // an actual device ID
  },
  "data_write": {         // Database queries that this device can call
    "query1": "...",      // via the mDashStore() function - see library API
    "query2": "..."       // for more details
  }
}
Usage guide
By default, end-customer device access is disabled. In order to enable end-customer device access:
- Set
public_keyto some unique, hard-to-guess value - like SHA1 hash. mDash client library does that automatically. With Mongoose OS, there are two ways of settingpublic_key: by directly editing the ACL on mDash, or by settingdevice.public_keyin a device firmware if it is empty. - Set
shadow_readandshadow_writeproperties in order to expose device shadow. - Set
rpcproperty in order to expose certain RPC functions. - Set
data_readproperty in order to expose device's data to an external customer. Thedata_readis an object, where keys become URL endpoints, and values are SQL queries to your database. In a query,DEVICE_IDis automatically replaced with and actual device ID. - Set
data_writeproperty in order to to allow devices store data into the database. Thedata_writeis an object, where keys are names and values are SQL queries. Queries can take parameters. Devices should callmDashStore(name, ...)API function in order to store data. See mDash library API::mDashStore for more details.
Config example
This is an example of the ACL that enables shadow, RPC and data for the end customers:
{
  "shadow_read": "^.state.reported.(online|ota.id|config.*)",
  "shadow_write": "^.state.desired.(foo|config.*)",
  "rpc": "Sys.Reboot,MyDevice.*",
  "data_read": {
    "query1": "SELECT COUNT(*) FROM data WHERE device_id='DEVICE_ID'",
    "query2": "SELECT * FROM data WHERE device_id='DEVICE_ID'",
    "query3": "SELECT * FROM data WHERE topic=?"
  },
  "data_write": {
    "query1": "INSERT INTO data (timestamp,device_id,topic,message) VALUES (?,?,?,?)"
  },
  "public_key": "dch0bBsVvB8lumlXR0C7Tw"
}
Request examples
Get device shadow (note that only keys set in shadow_read are shown):
curl https://mdash.net/api/v2/m/device?access_token=PUBLIC_KEY
Modify device shadow (note that shadow value matches shadow_write):
curl -H 'Content-Type: application/json' \
  -d '{"shadow": {"state": {"desired": {"foo": 42}}}}' \
  https://mdash.net/api/v2/m/device?access_token=PUBLIC_KEY
Call RPC function without parameters (note that Sys.Reboot is listed in rpc):
curl https://mdash.net/api/v2/m/device/rpc/Sys.Reboot?access_token=PUBLIC_KEY
Call RPC function with parameters (note that MyDevice.Act is listed in rpc):
curl -H 'Content-Type: application/json' -d '{"foo": 42}' \
  https://mdash.net/api/v2/m/device/rpc/MyDevice.Act?access_token=PUBLIC_KEY
Get device data (note that query2 is a key in data_read):
curl https://mdash.net/api/v2/m/device/data/query2?access_token=PUBLIC_KEY
If an SQL query contains ? placeholders, then it is possible to pass
respective SQL query parameters in the request body. Query parameters should be
an array and their types should correspond expected query types. Run query3
pass parameters ["foo"] to that query:
curl -H 'Content-Type: application/json' -d '{"params":["foo"]}' \ \
  https://mdash.net/api/v2/m/device/data/query3?access_token=PUBLIC_KEY
Notifications
mDash provides a special secure Websocket endpoint
wss://mdash.net/api/v2/notify. This is a read-only notifications endpoint.
Each notification is a JSON object with three keys:
name: notification name, e.g. "online", "offline", "rpc.in.GetInfo", "rpc.out.Log"id: an ID of a device that generated the eventdata: optional notification-specific data.
The online and offline events are generated by the dashboard. The
rpc.out.* events are generated by the device: these are JSON-RPC requests
without an ID (notifications). For example, dash library forwards all
device logs to the dashboard as Log RPC calls, thus generating rpc.out.Log events.
RPC call to the device generate rpc.in.* events.
The dashboard UI uses /api/v2/notify endpoint in order to catch state changes.
Login to the dashboard and open the developer tools / network / WS panel to
see it in action.
NOTE: by bringing up a custom notification catcher, you can integrate with any other 3rd party service - for example, store data into a Google, AWS, or Azure cloud. See next section for an example.
Catching notifications
You can implement your own service that attaches to the /api/v2/notify,
for example in Node JS (don't forget to substitute API_TOKEN with your real
API access token). This is a simple Node.js program that can show
all incoming notifications:
const Websocket = require('ws');  // npm install -g ws
const addr = 'wss://mdash.net/api/v2/notify?access_token=API_TOKEN'; // <- Modify!
const ws = new Websocket(addr, { origin: addr });
ws.on('message', msg => console.log('Got message:', msg.toString()));
To see your mDash API tokens, login to mDash and click on "Keys" tab.
Sending notifications
Notifications are sent by devices, and some notifications (like online/offline) are generated by mDash. The device API is documented at mDash library API. Here is a quick example:
mDashNotify("MyStat", "{%Q: %f}", "temperature", 12.34);
Note that the format of data is arbitrary - it could be anything: a number,
a string, an array, or a complex nested object. It's up to you. In this
example, a simple object {"temperature": 12.34} is used. The
example generates the following notification:
{
  "id": "DEVICE_ID",        // This is the device ID that generated notification
  "name": "rpc.out.MyStat", // "rpc.out.EVENT_NAME", in our case rpc.out.MyStat
  "data": {"temperature": 12.34}  // Your event payload - arbitrary
}
If you start your own notification catcher, you cat perform any custom action depending on a received event. For example, do some analysis, send SMS alert, etc. This is the way to extend mDash functionality.
Device connection
This section explains what happens when a device connects to mDash.
- TCP connection. Device performs TCP connection to mdash.net
- TLS handshake. Device performs TLS1.2 handshake
- Websocket handshake. Device performs Websocket handshake
- Device sends
Authorization: Bearer DEVICE_PASSWORDheader to authenticate - If mDash already has alive connection from the device with the same password, that old connection is considered stale and gets closed
- Device sends
- Online event. mDash sends
onlinenotification - Who are you? mDash sends
{"id":1,"method":"Sys.GetInfo","params":{"utc_time":1558870586},"src":"$sys/d1"}message to a device, thus calling theSys.GetInfoRPC method - Setup local time. A device sets the local time to
utc_timeif it is not already set - Sys.GetInfo reply. A device replies with the message similar to this:
{ "fw_version": "1.0.18-arduino-10809-pico32", "arch": "esp32", "fw_id": "20190526-102743", "app": "sketch_huzzah32.ino", "status": 0, "uptime": 6, "reboot_reason": "power-on" } - Store Sys.GetInfo reply in shadow state.reported.ota. mDash stores the received
Sys.GetInforeply to thestate.reported.otadevice shadow section, in order to provide essential information about the device even if it is offline - Idle - normal operation. Device works according to the firmware-specific logic.
- Disconnect. When a device disconnects, this usually happens in a non-clean way (e.g. device power-off). mDash sends TCP keep-alive every 20 seconds, and closes the connection after 3 failed keep-alives. When a connection is closed, mDash sends
DEVICE_IDmessage to thedb/offlinetopic. Disconnected device automatically goes to step 1 (reconnects)
Remote control
mDash provides two remote control mechanisms:
- Device shadow: state management mechanism. Device shadow is a document that lives on a cloud. Shadow keeps device state, thus changing shadow makes a real device synchronise with a shadow and change its state.
- RPC - remote procedure call: request-response mechanism. A well-known, traditional approach. A device implements a set of named functions, and those functions could be called via HTTP/REST.
Depending on a task, one or another mechanism suits better. Lets take a smart light for example: it could be turned "on" or "off".
- Shadow mechanism. We define a variable in a shadow, call it
light. When a shadow variablelightis set totrue, a real device gets a notification, synchronises and switches on. Whenlightis set tofalse, a device is switched off. Important note: when a device reboots and connects to mDash, it synchronises with a shadow, so device state persists reboots. It is stored in a cloud. - RPC mechanism. We define two functions on a device, name them
LightOnandLightOff. We can call either and device will react. Important note: after reboot or power off, a device would not "remember" its previous state. Also, we would need an extra RPC function to get the current state, if we want to display it on the mobile app.
In this smart light example, "remembering" the state could be an important requirement. A current state could be also cached on a device's filesystem. A firmware logic could use any of these two mechanisms.
RPC overview
RPC means Remote Procedure Call. This is the way to send commands to devices and receive replies, i.e. call remote procedures. Commands are sent to mDash via REST, and mDash sends commands to devices via JSON-RPC 2.0.
The diagram below describes an example device that implements RPC function
Sum that adds numbers a and b. We can call this function on a device
via REST API:
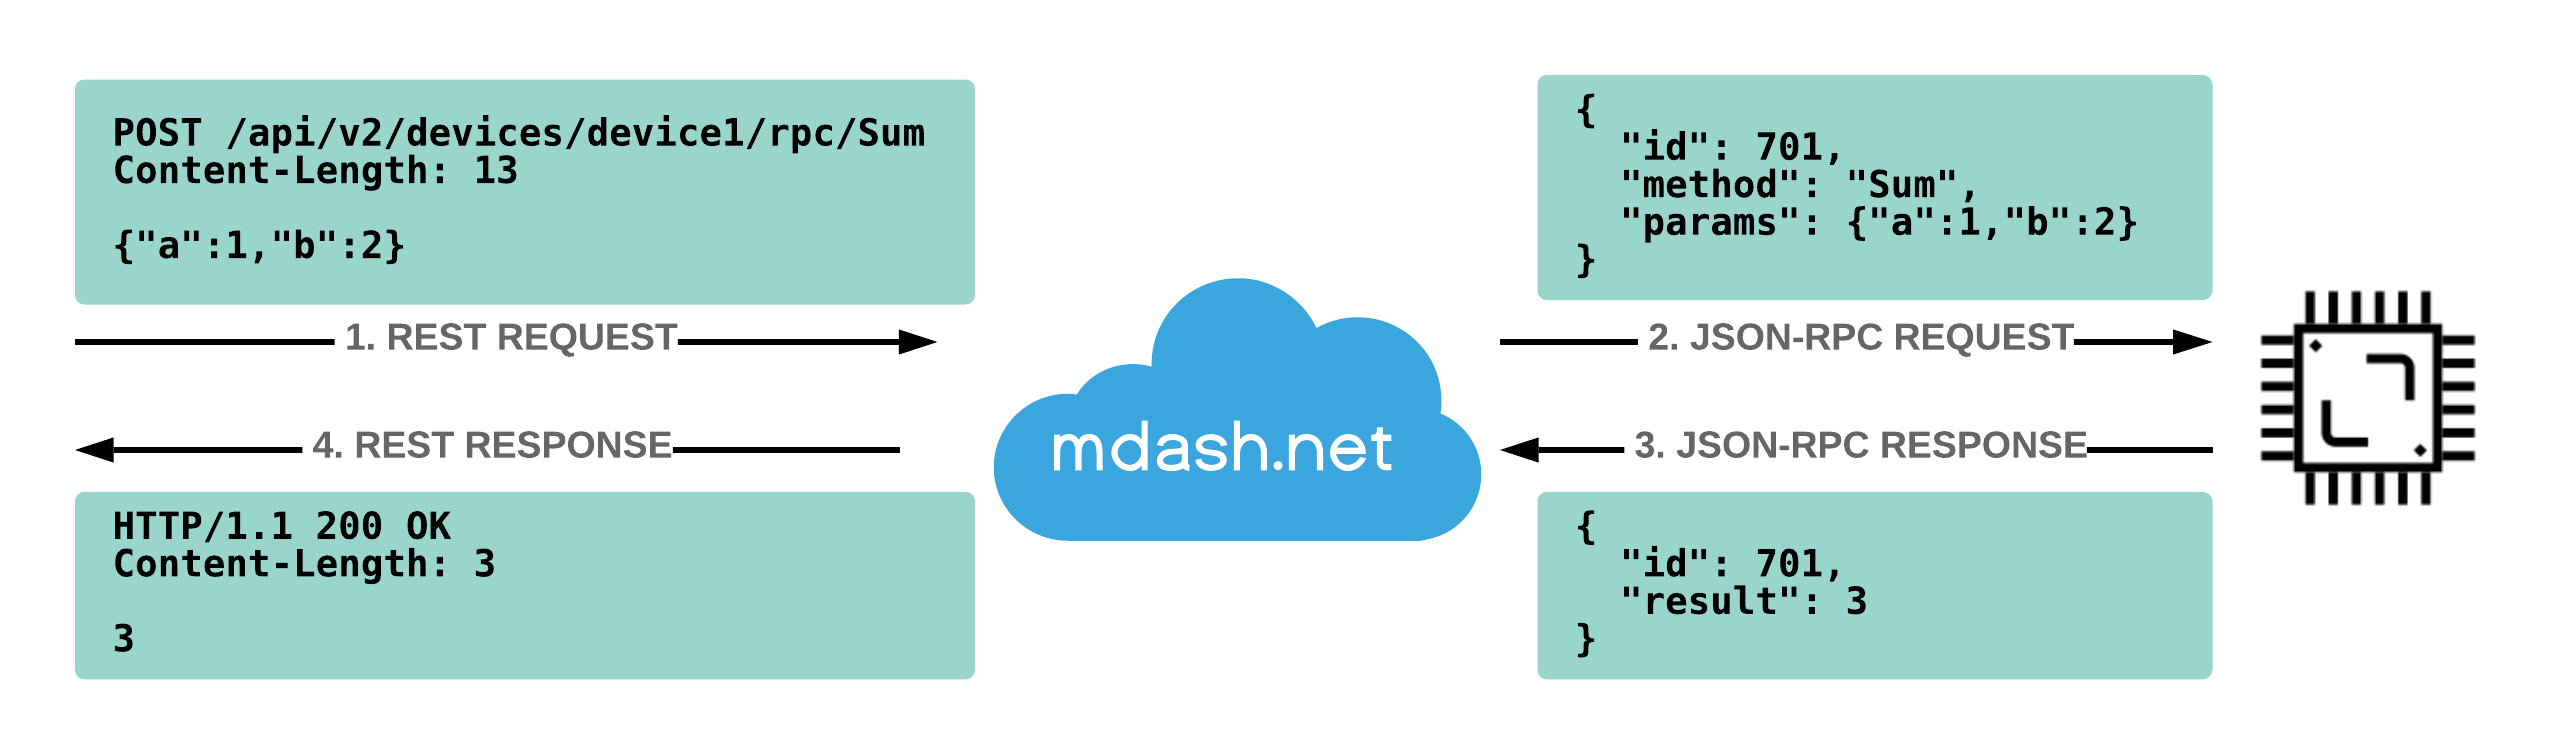
Using curl utility, the call above looks like this:
$ curl -H 'Content-Type: application/json' -d '{"a":1,"b":2}' \
  https://mdash.net/api/v2/devices/device1/rpc/Sum?access_token=API_KEY
3
You can call RPC functions on devices programmatically using any programming language / framework. Also, mDash UI provides an easy way to do it.
Call RPC via mDash
- Login to mDash
- Click on the "manage" link. NOTE: a device should be online!
- A management dialog appears. Click on RPC tab
- In the dropdown, select a method to call, for example
Sys.GetInfo - Click on "Call" button, see the response
mDash device library provides many built-in RPC functions - for managing files, rebooting, getting information, OTA, etc. It is possible to create any number of custom functions using mDash library: see Library API.
Call RPC via REST
In order to call device's RPC function, make a RESTful request to the
/api/v2/devices/DEVICE_ID/rpc/NAME endpoint. For example,
to list device's RPC functions, call a built-in function RPC.List:
$ curl https://mdash.net/api/v2/devices/DEVICE_ID/rpc/RPC.List?access_token=API_KEY
[
  "Sys.Reboot",
  "Sys.GetInfo",
  ...
]
Built-in RPC
Below is a list of built-in RPC services that are provided by the mDash client library and Mongoose OS. Of course you can define your own, but these are available out-of-the box:
| Name | Description |
|---|---|
| FS.List | Get device file list. Arguments: none. Return: array of string file names |
| FS.Get | Read device file. Arguments: {"filename":"a.txt","offset":0,"len":100}. Return: a base64-encoded content |
| FS.Put | Write device file. Arguments: {"filename":"a.txt","append":true,"data": "B64ENCODED"}. Return: true or false |
| FS.Remove | Delete device file. Arguments: {"filename":"a.txt"}. Return: true or false |
| FS.Rename | Rename device file. Arguments: {"src": "a.txt","dst":"b.txt"}. Return: true or false |
| Sys.Reboot | Reboot device. Arguments: none. Return: true |
| Sys.GetInfo | Get device info. Arguments: none. Return: an object with device information |
| RPC.List | Get RPC list. Arguments: none. Return: array of strings - RPC function names |
Node.js simulator
You can use this Node.js device simulator program to better understand how JSON-RPC works, and also to experiment with mDash. Note that built-in functions for filesystem and OTA are absent in this simulator. You could extend it with your own custom functions and manage this simulator via mDash:
// mdash.net device simulator. Run it like this:
// node mdash_device.js DEVICE_PASSWORD

const Websocket = require('ws');  // npm install -g ws
const u = 'wss://mdash.net/api/v2/rpc?access_token=' + process.argv[2];
const conn = new Websocket(u, {origin: u});
conn.on('message', msg => {
  let req = JSON.parse(msg), resp = {};  // request and response RPC frames
  if (req.method == 'Sys.GetInfo') {
    resp = {id: req.id, result: {arch: 'nodejs', app: 'app1'}};
  } else if (req.method == 'RPC.Describe') {
    resp = {id: req.id, result: null};
  } else if (req.method == 'RPC.List') {
    resp = {id: req.id, result: ['Sys.GetInfo', 'RPC.List', 'RPC.Describe']};
  } else {
    resp = {id: req.id, error: {code: -32601, message: 'method not found'}};
  }
  console.log('RPC:', req, '->', resp);
  conn.send(JSON.stringify(resp));  // Send reply to mDash
});
Device Shadow
Device shadow is a JSON object that is associated with a device. It lives on a cloud and keeps device state and custom metadata. Device shadow is always available via library and REST API, regardless whether an associated device is online or offline. Device shadow JSON object has the following structure:
state.desired- this is the state you want your device to havestate.reported- this is the state your device actually hasstate.delta- automatically generated difference betweendesiredandreportedtags- arbitrary metadata invisible to the device but visible to the cloud user
{
  "state": {
    "desired": {
       "switched_on": true   // State you want your device to have
                             // Should be changed by the cloud user
    },
    "reported": {
       "switched_on": false, // State your device actually has
       "ram": 12473          // Should be changed by a device
    },
    "delta": {
      "switched_on": false  // Difference between desired and reported
                            // ONLY FOR KEYS THAT ARE PRESENT IN DESIRED
                            //  Automatically generated on each change
    }
  },
  "tags": {
    "answer": 42  // Arbitrary cloud metadata
  }
}
The structure of the state.desired, state.reported and tags sub-objects is arbitrary - create whatever structure you wish.
Idiomatic usage
- When a device is connected to the mDash,
- Subscribe to the shadow delta topic
DEVICE_ID/shadow/delta - Report current state by sending a message
{"state": {"reported":{...}}}to aDEVICE_ID/shadow/updatetopic
- Subscribe to the shadow delta topic
- When a message is received on a delta topic, handle it and then report current state like on a previous step
Automatic values
mDash creates and maintains several shadow values automatically:
state.reported.online- a boolean value, showing device online statestate.reported.ota- an object that contains device information, specifically, a result of theSys.GetInfoRPC call
Example:
{
  "state": {
    "reported": {
      "online": true,                   // created automatically
      "ota": {                          // created automatically
        "app": "my-product",            // created automatically
        "arch": "esp32",                // created automatically
        "fw_id": "20190613-141510",     // created automatically
        "fw_version": "1.0.28-idf",     // created automatically
        "ram_free": 45172,              // created automatically
        "reboot_reason": "power-on"     // created automatically
      }
    }
  },
  "tags": {
    "labels": "prod devkit"
  },
  "version": 3331,
  "timestamp": 1560498134
}
Deleting shadow keys
In order to create new keys, simply send a shadow update with a new key and its value. In order to delete a key, send a shadow update where a key is set to null:
{"state": {"reported": {"my_key": null}}}
Built-in database
Each mDash account owns an isolated SQLite3 database. That database is under your full control. You can create, delete tables, insert and remove data records, etc. Also, you can download an entire database at any point.
By default, mDash creates data table, used by mDash to store events
like device coming online / offline, etc.
mDash does not backup user database. If required, an automatic download/backup
should be implemented by an external application. DB download works as any
other API call; the output is not a JSON response but a binary SQLite3 file
instead. An example download using curl utility:
curl -H 'Authorization: Bearer API_KEY' \
     -o my.mdash.db \
     https://mdash.net/api/v2/sql/download
Once downloaded, you can use sqlite3 command line utility. The DB schema
that is shown is the default schema created at account registration:
$ sqlite3 my.mdash.db
sqlite> .schema
CREATE TABLE data (
        timestamp DATETIME DEFAULT CURRENT_TIMESTAMP,
        device_id TEXT NOT NULL,
        topic TEXT NOT NULL,
        message TEXT NOT NULL
    );
CREATE INDEX data1 ON data(timestamp);
CREATE INDEX data2 ON data(device_id);
CREATE INDEX data3 ON data(device_id,timestamp);
sqlite> select count(*) from data;
1319463
Retrieve data
Database is accessible via the https://mdash.net/api/v2/sql/exec endpoint.
Example curl command looks as follows:
curl -d "query=select * from data limit 10;" \
    https://mdash.net/api/v2/sql/exec?access_token=YOUR_API_TOKEN
You can execute any query that SQLite3 supports, see SQLite3 documentation.
mDash UI provides an easy way to the SQL REST API:
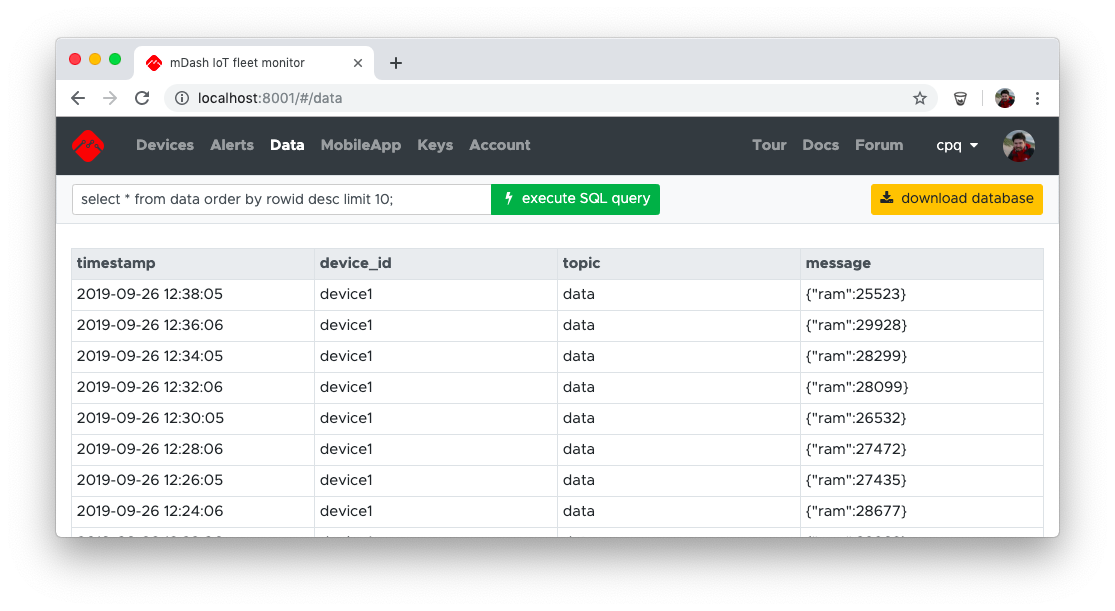
Example queries
select * from data order by rowid desc limit 10;- last 10 entries from data tableselect count(*) from data;- number of records in table dataselect * from sqlite_master;- database schema
Store data
You can store data by issuing SQL INSERT statements. REST clients can do it directly via the REST SQL API with no restrictions.
Devices, however, must be restricted, because any single leaked device
password could be used to wipe out the entire database. Therefore, devices
cannot access SQL API directly. They must use only allowed, safe methods
to store data. Currently, the only way to store data from a device is to
send a notification message to mDash, with the name DB.Save and parameters.
That will save a record to the data table, with data topic. Example:
mDashNotify("DB.Save", "{%Q:%u}", "ram", mDashGetFreeRam());
Restricted access
Above, we have described administrator-level access to the database. Administrator is you - the one that holds a management API key, and has full control over the whole fleet, including database. Also, mDash provides a restricted access to devices: device shadow, device RPC functions, and device data. See ACL for more details.
Limitations
The database is limited in size. Maximum size is
number_of_devices X per_device_limit. The following table summarises
limits:
| Account type | Per device storage size limit | DB size limit |
|---|---|---|
| Free | 100K | 1M |
| Business | 1M | 50M |
| Custom | 10M or more | unlimited |
OTA updates
This guide describes how to remotely update firmware with mDash.
- If your device is not yet connected to mDash, follow the quick start to connect
- Export your firmware file:
- Arduino: in Arduino IDE menu, select "Sketch" > "Export compiled binary"
- ESP-IDF: execute
make allin the project directory. That will producebuild/PROJECT_NAME.binfile - Mongoose OS: execute
mos buildin the project directory. That will producebuild/fw.zipfile
- In mDash device dashboard, click on "OTA update" link. A file selection dialog appears
- Navigate to the firmware file and select it
- Done! Just wait until the OTA is finished.
The animation below shows an example for the compiled Arduino sketch:
Using REST API
Since OTA updates are using REST API, you can update your devices
programmatically. One way to do it is to use a curl utility. Here is
the command:
curl -F file=@PATH/TO/FIRMWARE.BIN https://mdash.net/api/v2/devices/DEVICE_ID/ota?access_token=API_TOKEN
The API_TOKEN you can get in the mDash's Keys tab. Example:
curl -F file=@build/fw.bin https://mdash.net/api/v2/devices/device4/ota?access_token=2319oafvm9x23423ds
Web App
An app - web app, or iOS/Android app, is something you give to your customers to actually use your product. Whether it is a simple smart plug, or a complex factory monitoring product with plenty of sensors and dashboards - an app always ships together with your physical devices.
Your customers register, login, and interact with their devices and data using an app. mDash provides a Customer REST API that app can use to get a restricted access for devices.
Traditionally, there two kinds of apps:
- A native mobile app for iOS/Android. If you decide to go this way, develop and publish a native app yourself.
- A web app. Arguably this kind of app is much easier to develop, support and maintain. mDash provides web app serving functionality, and a ready to go example implementation.
mDash can serve a PWA web app that is under your full control. By default, a web application from the Smart Light reference project (described in a Quick Start) is served, located at https://github.com/cesanta/mdash-smart-light/tree/master/mobile-app. That default web app provides customer registration, login screen, and Smart Light device control.

You could take the default application, modify, and upload your own version. The default app uses PWA technology, i.e. it is a progressive web app. It is written using Bootstrap and Preact. The Preact code is written in a plain ES3 JavaScript, without JSX or similar layer, in order to avoid an extra build step. You, however, can use absolutely any Web development stack.
If you decide to implement iOS or Android native app for your customers, you could to that. Use PWA Web App as an API usage reference.
Management REST API
In the following reference, a https://mdash.net/api/v2 prefix must be added
to all mentioned URLs. To get your API key, click on "Keys" tab then click on
the key to copy it to the clipboard. Example REST call:
$ curl https://mdash.net/api/v2/devices?access_token=API_KEY
[
  {
    "id": "d5",
    "online": true,
    ...
]
| Type | URL | Params | Description |
|---|---|---|---|
| GET | /devices | - | Return a list of all created devices |
| POST | /devices | - | Create a new device and return it |
| POST | /devices/:id | {"shadow": {...},"acl":{...}} |
Modify device shadow or device ACL, return modified device |
| DELETE | /devices/:id | - | Delete device |
| POST | /devices/:id/rpc/:func | {...} |
Call device's RPC function |
| GET | /devices/:id/rpc/:func | - | Call device's RPC function with no params |
| POST | /devices/:id/ota | firmware-binary | Update firmware: curl -F file=@fw.bin URL |
| GET | /keys | - | Return a list of all API keys |
| POST | /keys | - | Create and return a new API key |
| DELETE | /keys/:id | - | Delete an API key |
| POST | /m | .zip | Upload WebApp PWA .zip file |
| GET | /customers | - | Return a list of all registered customers |
| POST | /customers/:id | {"email": "a@b.c","pubkeys":{"KEY1":{},"KEY2":{}}} |
Update customer with given customer ID |
| DELETE | /customers/:id | - | Delete customer with given customer ID |
| POST | /invite | {"app_id": ID, "from": "YOUR APP NAME", "text": "EMAIL TEXT", "redir": "YOUR APP URL", "email": "CUSTOMER EMAIL", "url": "https://mdash.net"} |
Send invitation email. NOTE: the URL for this call is https://mdash.net/invite |
Customer REST API
This is a non-authenticated API for registering new customers.
| Type | URL | Params | Description |
|---|---|---|---|
| GET | https://mdash.net/newcustomer | email=EMAIL |
Send an invitation to the customer's email with the confirmation link and customer's access token. |
Every request must have a ?access_token=CUSTOMER_KEY
query string attached, or a Authorization: Bearer CUSTOMER_KEY header
specified.
| Type | URL | Params | Description |
|---|---|---|---|
| GET | https://mdash.net/customer | - | Return customer object |
| POST | https://mdash.net/customer | {"cconfig": ...} |
Update customer's metadata |
Every request must have a ?access_token=DEVICE_PUBLIC_KEY
query string attached, or a Authorization: Bearer DEVICE_PUBLIC_KEY header
specified.
| Type | URL | Params | Description |
|---|---|---|---|
| GET | https://mdash.net/api/v2/m/device | - | Return device object stripped according to the ACL |
| POST | https://mdash.net/api/v2/m/device | {"shadow": ...} |
Change device shadow, according to the ACL |
| POST | https://mdash.net/api/v2/m/device/data/:name | {"params":[...]} |
Get stored device data using name ACL query |
| POST | https://mdash.net/api/v2/m/device/rpc/:name | {...} |
Call device RPC function. An RPC method :name should be allowed in the device ACL |
Each device also has a Websocket notification endpoint:
wss://mdash.net/api/v2/m/device/notify?access_token=DEVICE_PUBLIC_KEY.
Client Library API
This howto documents mDash library API. The library could be used in Arduino IDE or ESP-IDF environments, and it is located at https://github.com/cesanta/mDash.
mDashBegin
void mDashBegin(DEVICE_PASSWORD);
This function should be the first mDash function called in the setup() .
It initialised the mDash library. If a device has WiFi and cloud credentials
setup (via the Serial provisioning process, or via the API), then
The library creates TLS connection to the
mdash.net service and keeps it alive, reconnecting
automatically when required. DEVICE_PASSWORD is an mDash device password.
Example usage for Arduino IDE:
#define MDASH_APP_NAME "MinimalApp"
#include <mDash.h>

#include <WiFi.h>

#define WIFI_NETWORK "MyWifiNetworkName"
#define WIFI_PASSWORD "MyWifiPassword"
#define DEVICE_PASSWORD "mDashDeviceToken"

void setup() {
  Serial.begin(115200);
  WiFi.begin(WIFI_NETWORK, WIFI_PASSWORD);
  mDashBegin(DEVICE_PASSWORD);
}

void loop() {
  delay(100);
}
In order to use mDash library with the ESP-IDF framework, do the following:
- Download mDash library to your app source directory:
git clone --depth 1 https://github.com/cesanta/mDash
- Modify app's
Makefileto link with mDash library:
EXTRA_LDFLAGS = -L$(CURDIR)/mDash/src/esp32 -lmDash # Add this line
- Modify app's main source file to include mDash initialisation:
void initWiFi(const char *wifi_network_name, const char *wifi_pass) {
  wifi_init_config_t cfg = WIFI_INIT_CONFIG_DEFAULT();
  ESP_ERROR_CHECK(esp_wifi_init(&cfg));
  // ESP_ERROR_CHECK(esp_wifi_set_storage(WIFI_STORAGE_RAM));
  wifi_config_t wc = {};
  if (wifi_network_name != NULL) {
    strncpy((char *) wc.sta.ssid, wifi_network_name, sizeof(wc.sta.ssid));
    strncpy((char *) wc.sta.password, wifi_pass == NULL ? "" : wifi_pass,
            sizeof(wc.sta.password));
    MLOG(LL_INFO, "Connecting to WiFi network %s...", wc.sta.ssid);
    ESP_ERROR_CHECK(esp_wifi_set_mode(WIFI_MODE_STA));
    ESP_ERROR_CHECK(esp_wifi_set_config(ESP_IF_WIFI_STA, &wc));
  } else {
    uint8_t mac[6];
    esp_wifi_get_mac(WIFI_IF_STA, mac);
    wc.ap.ssid_len = snprintf((char *) wc.ap.ssid, sizeof(wc.ap.ssid),
                              "%s-%02X%02X", MDASH_APP_NAME, mac[4], mac[5]);
    wc.ap.max_connection = 5;
    wc.ap.beacon_interval = 100;
    memset(wc.ap.password, 0, sizeof(wc.ap.password));
    wc.ap.authmode = WIFI_AUTH_OPEN;
    MLOG(LL_INFO, "Starting WiFi network %s...", wc.ap.ssid);
    ESP_ERROR_CHECK(esp_wifi_set_mode(WIFI_MODE_AP));
    ESP_ERROR_CHECK(esp_wifi_set_config(ESP_IF_WIFI_AP, &wc));
  }
  ESP_ERROR_CHECK(esp_wifi_start());
}

void app_main() {
  mDashBeginWithWifi(initWiFi, NULL, NULL, NULL);

  initMyFirmware(); // Initialise your firmware - implement this function
  for (;;) {
    vTaskDelay(10 / portTICK_PERIOD_MS);  // Sleep 10ms
    mDashCLI(getchar());                  // Handle CLI input
  }
}
- Build and flash your firmware to a device
- Connect to your device via a serial console and type following commands:
set wifi.sta.ssid YOUR_WIFI_NAME
set wifi.sta.pass YOUR_WIFI_PASSWORD
set device.pass MDASH_DEVICE_PASSWORD
reboot
- The above commands setup WiFi and access credentials in the
mdash.cfgfile, and after a reboot, device connects to mDash. From that point on, it is possible to rebuild a firmware and OTA it remotely to a device.
mDashConfigGet
int mDashConfigGet(const char *name, char *buf, size_t bufsize);
Get configuration parameter name stored in the mdash.cfg file.
Return value:
0: the config variablenamewas found and copied intobuf-3: the config variablenamewas not found inmdash.cfg-2: the destination buffer sizebufsizeis too small to hold the value-1: the cofig filemdash.cfgis absent or could not be opened
mDashConfigSet
int mDashConfigSet(const char *name, const char *value);
Set the config variable name to value by saving it to the config
file mdash.cfg. If value is NULL or an empty string, the configuration
variable is removed from the config file.
Return value:
0: successfully saved-1: error opening config file
Some of the configuration variables are used by the library:
wifi.sta.ssid: WiFi network namewifi.sta.pass: WiFi passworddevice.pass: registered device password (token)device.public_key: access token for the external customersdebug.level: logging level. Default is 2. Use 0 to disable, 3 to verbose
mDashShadowUpdate
int mDashShadowUpdate(const char *json_format, ...);
Update device shadow.
Example: report free RAM to the shadow
  mDashShadowUpdate("{%Q:{%Q:{%Q:%d}}}",
                    "state", "reported", "RAM", mDashGetFreeRam());
Return value: 1 if the update was sent, 0 if not (e.g. because a network is down).
mDashNotify
int mDashNotify(const char *name, const char *json_format, ...);
Send notification name to mDash. Return value: 1 if the update was sent, 0
if not (e.g. because a network is down).
Notifications are supposed to be caught by the user's notification catcher. If they are not, they are simply dropped on the floor and have no effect.
However, certain notifications are handled by mDash automatically. This is a list:
Shadow.Update, params:{"state":{...}}- sends device shadow update. ThemDashShadowUpdateis just a wrapper for this notificationShadow.Get, params: none. This notification makes mDash to call aShadow.GetRPC function on a device, passing a complete device shadowHTTP.Request, params:{"url":"..","method":"..","body":"..","headers":{..}}- call some remote HTTP service with given parametersDB.Store, params:["query1", ...]- calls database SQL query with parameters. Used to store device data. SeemDashStore()section belowDB.NewData, params: none. This notification is used by themDashStore()function to notify mDash that a new data is available on device's flashDB.Save, params:...- a shortcut forDB.Store. Saves data into thedatadefault table.
mDashStore
int mDashStore(const char *name, const char json_format *, ...);
Store data into a database. name is the query name in the data_write
device ACL, and json_format specify query parameters. Query parameters
may be string or numeric. The following special tokens are automatically
replaced by mDash before storing into the database:
DEVICE_IDis substituted with an actual device ID that makes a callCUSTOMER_IDis substituted with an actual customer ID a calling device belongs to
Note: both
DEVICE_IDandCUSTOMER_IDmust be specified in the ACL in order to be substituted. Do not pass them as query parameters, as substitution does not happen for parameters.
Note: this call does not send data to the mDash directly. Instead, it stores data into a local file
mdash.unsentfile, and raises a notification eventDB.NewDatato the mDash. When mDash receives that notification (or, when a device gets connected), mDash fetchesmdash.unsentfile from a device, saves all records to a database, and deletesmdash.unsenton a device. This pipelining logic protects data from the occasional network outages. Ifmdash.unsentfile size gets over the 32k limit,mdash.unsentfile is renamed tomdash.unsent.oldwhich is processed my mDash too. Such rotation logic allows to keep up to 64k of the most recent data.
Return value: 1 if the data was successfully writen to the spool file, 0 on error (e.g. failed to open the spool file).
Example:
double temperature = 123.45;
mDashStore("query1", "[%Q, %g]", "2019-12-31 23:59:59", temperature);
The associated device ACL must have a query1 key in the data_write section,
and have query parameters that match the mDashStore() call:
{
  "public_key": "...",
  "data_write": {
    "query1": "INSERT INTO tab1 (timestamp,device_id,temperature) VALUES(?,'DEVICE_ID',?)"
  },
  ...
}
Note: if you want to bypass storing data on flash, and send data immediately, call
mDashNotify("DB.Store", ...), passing query name with parameters. In this case, data could be lost on network failures, but would not hit flash. Example:
mDashNotify("DB.Store", "[%Q,%Q,%Q,%g]", "query1", "2019-12-31 23:59:59", "DEVICE_ID", temperature)`.
mDashGetState
int mDashGetState(void);
Return current device connection state, one of MDASH_STATE_* values.
mDashGetFreeRam
unsigned long mDashGetFreeRam(void);
Return free RAM in bytes
Service limitations
| Name | Limit |
|---|---|
| Max message size | 8K |
| Max device shadow size | 8K |
| RPC call timeout | 30 seconds |
| Customer metadata size | 32K |
| Data storage size per device | from 100K to 10M and more, see Database |
Howtos
Crash backtrace
If you're got your Arduino ESP32 sketch crashing with a message similar to this:
Guru Meditation Error: Core  0 panic'ed (StoreProhibited). Exception was unhandled.
Core 0 register dump:
...
Backtrace: 0x400d2606:0x3ffc91e0 0x400d334b:0x3ffc9200 0x400d354f:0x3ffc92a0 0x400d40bb:0x3ffc9330 0x400887a1:0x3ffc9b50
Rebooting...
Notice the Backtrace: BACKTRACE_ADDRESSES line? It points to the place where
the crash has happened. That line is not human-readable. It must be symbolised
and converted into the file name/line number list. This is how to do it.
Step 1. Find the xtensa-esp32-elf-addr2line utility
This utility comes with the Arduino's support package for Espressif.
Seach for it in the Arduino installation directory. For example, on Macos
this is $HOME/Library/Arduino15. On your system, it could be in a different
location.
Step 2. Find your firmware .elf file
This .elf file is produced by the firmware build process. If you're using
Arduino IDE, search in the temporary folder for the file called
YOUR_SKETCH_NAME.ino.elf.
If you're using ESP-IDF, the .elf file is in the build/ directory,
together with the firmware .bin file.
Step 3. Symbolise backtrace
Start command prompt (or terminal on Mac / Linux), and enter the following command (note on Windows it is xtensa-esp32-elf-addr2line.exe):
xtensa-esp32-elf-addr2line -pfiaC -e ELF_FILE BACKTRACE_ADDRESSES
Here is an example for Macos:
$ /Users/lsm/Library/Arduino15/packages/esp32/tools/xtensa-esp32-elf-gcc/1.22.0-80-g6c4433a-5.2.0/bin/xtensa-esp32-elf-addr2line \
 -pfiaC -e \
 /var/folders//bh/y02gkfp16bn42q1t79rf_ty80000gn/T/arduino_build_936069/sketch_sep23a.ino.elf \
 0x400d2606:0x3ffc91e0 0x400d334b:0x3ffc9200 0x400d354f:0x3ffc92a0 0x400d40bb:0x3ffc9330 0x400887a1:0x3ffc9b50

0x400d334b: fsput at /Users/lsm/src/alib/rpc.c:233
0x400d354f: jsonrpc_ctx_process at /Users/lsm/src/alib/mjson.c:869
0x400d40bb: onMessage at /Users/lsm/src/alib/mDash.c:129
 (inlined by) mDashTask at /Users/lsm/src/alib/mDash.c:235
Call from Node.js
This tutorial has an example code on how to call device function in Node.js
- Save snippet below into a file, e.g.
mdashcall.js - Edit
ACCESS_TOKEN, save the file - Optionally, edit
DEVICE_ID/PARAMETERSif you want to call other functions - In the command prompt/terminal, run
node mdashcall.js
var ACCESS_TOKEN = 'xxx';  // To get token, see Account page
var DEVICE_ID = 'd1';
var METHOD = 'Sys.GetInfo';
var PARAMETERS = {pin: 2, val: 0};

// mdashRequest definition
var https = require('https');
var mdashRequest = function(apiToken, deviceID, method, params, func) {
  return new Promise(function(resolve, reject) {
    var received = '';
    var strParams = JSON.stringify(params || {});
    var url = 'https://mdash.net/api/v2/devices/' + deviceID + '/rpc/' +
        method + '?access_token=' + apiToken;
    var options = {
      method: 'POST',
      headers: {
        'Content-Type': 'application/json',
        'Content-Length': strParams.length
      }
    };
    var req = https.request(url, options, function(res) {
      res.on('data', data => received += data);
      res.on('end', () => resolve(received));
    });
    req.on('error', err => reject(err));
    req.write(strParams);
    req.end();
    });
};

// example call
mdashRequest(ACCESS_TOKEN, DEVICE_ID, METHOD, PARAMETERS)
    .then(response => console.log('RESPONSE:', response))
    .catch(err => console.error('ERROR:', err));
Call using curl
How to get an API key

- Login to mdash.net
- Click on "Keys" tab
- Click on the API key to copy it to the clipboard
List device's RPC functions
$ curl https://mdash.net/api/v2/devices/DEVICE_ID/rpc/RPC.List?access_token=API_KEY
[
  "Sys.Reboot",
  "Sys.GetInfo",
  ...
]
Call device's custom RPC function
$ curl -H 'Content-Type: application/json' \
       -d '{"pin": 2}' \
       https://mdash.net/api/v2/devices/DEVICE_ID/rpc/GetTemperature?access_token=API_KEY
23.4
** See device shadow**
$ curl https://mdash.net/api/v2/devices/DEVICE_ID?access_token=API_KEY
{
  "id": ...,
  "shadow": { .... }
}
Change device shadow
$ curl -H 'Content-Type: application/json' \
       -d '{"shadow":{"state":{"reported":{"message":"hello"}}}}' \
       https://mdash.net/api/v2/devices/DEVICE_ID?access_token=API_KEY
{
  "id": ...,
  "shadow": { .... }
}